Domestic Machine Quilting: Simple Free-Motion Designs
Hello again. We have been discussing heaps of things to do with ruler quilting in the last couple of articles. The last article explored how to combine ruler work with free-motion designs. This issue I am going to show you how to make those simple free-motion shapes to use with your ruler work or on their own.
First, a reminder on the things to consider when starting free-motion quilting
There are a few things to think about before you start:
- Make sure you are comfortable and that the space around your machine is tidy, so you do not keep bumping into things.
- Have a nice flat surface to quilt on, so the quilt flows well and does not get caught up.
- Create a practice sandwich to use before you go into your real project; it’s great for checking tensions, stitch length and myriad other things. You do not need to unpick a practice piece!
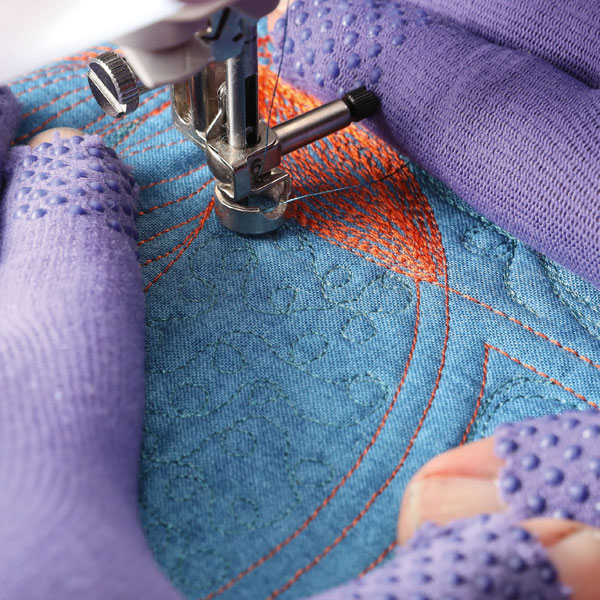
- Consider wearing quilting gloves for a good grip of the quilting sandwich, without straining your hands.
- When you begin, use a thread with a little contrast so you can see it, but not so much that all your mistakes shine brightly.
- Always use good-quality needles and threads, even when you are practising.
Prepare for quilting
- If you are working on a sit-down or domestic machine, set up your machine with your free-motion foot or ruler foot, extension table and a slip mat. The advantage of using your ruler foot is that you can change styles of quilting without changing your foot. Experiment with what you have got.
- Put on your gloves if you use them to quilt.
- For a frame quilting machine, load your sandwich to the machine as you would a normal quilt.
- Wind bobbins and prepare threads.
- Ensure the machine is threaded correctly.
- Using the practice sandwich, or edge of your quilt, test tensions and movement/stitch length.
Steps to stitching out free-motion quilting designs
For every new design you try, follow these three steps:
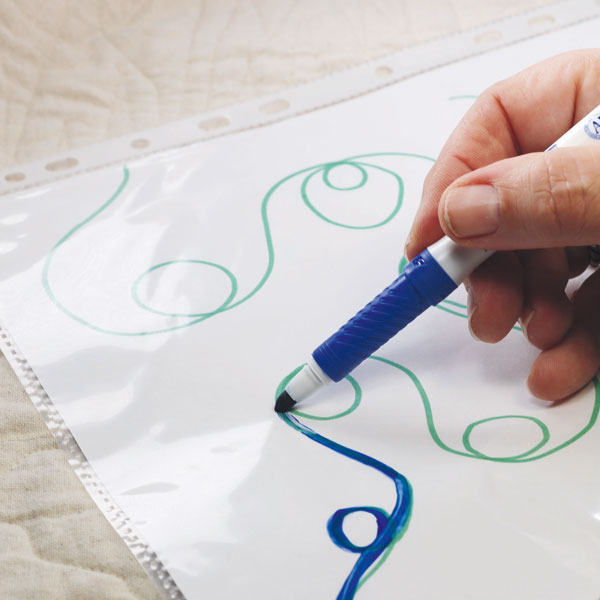
Step 1: Drawing out your design tracing with a pen
- Draw out your design on a piece of paper.
- Cover that design in a piece of template plastic, vinyl, or a page protector. This means you can trace over the lines with a white board maker many times. Just trace, wipe off and repeat.
- The key to the tracing process is to keep your pen down on the plastic without lifting it off. If you think about it, every time you lift the pen it is the equivalent of cutting your thread. This would mean more ends to sew in and the design not flowing freely.
- Always trace at the constant speed that you would be quilting at, not jerking or speeding up and slowing down. Again, when you are stitching, this would lead to short and long stitches.
- The whole point of this step is to smooth out your hand movements, so do not rush it. If you are getting a bit lost down the track when you are stitching, go back to this step to get your motion smooth again.
Step 2: Stitch out the design on a practice piece
- It is always worth testing out a design before you stitch it out on the main quilt. This is practising the motion, but also you might find that you do not like it stitched out and you can then choose another design.
Step 3: Stitch out the designs on your final piece
- By repeating the process on your final piece, you are reinforcing the skills you have learnt.
- You will also find that you may be stitching on a larger piece, so you will need to control the quilt sandwich as you quilt.
- I find pushing the excess quilt into the harp of the machine works better than rolling the quilt into a log. The quilt is far easier to manoeuvre.
- Start in the middle of the quilt. The centre of the quilt will always be the hardest to work with, but it gets easier as you go out to the borders.
- Never sew down the edges of the border before quilting as this will usually result in puckering and bunching at the edge as the quilt is spread out at the edges from the middle.
Simple quilting designs
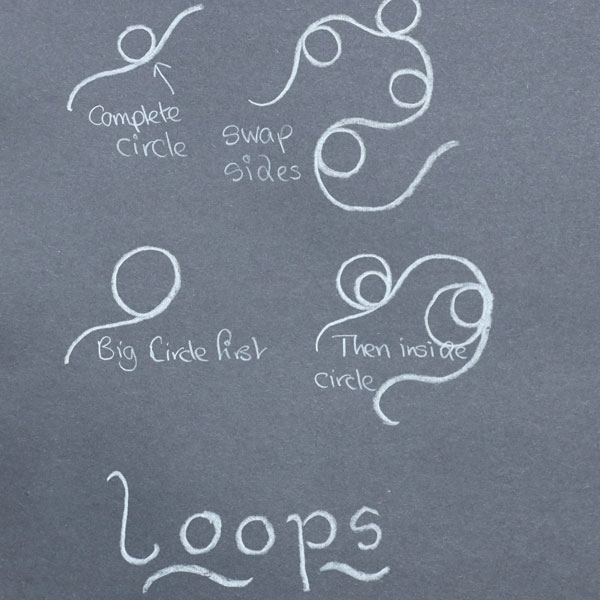
Loops and circles
- It is best to keep your movement steady and reasonably fast for smooth circles.
- Alternate the direction the loops come from the meander line, otherwise they look like they are hanging in a row.
- When completing double or more loops, start at the outside loop so that you know how much space the design is going to take up.
- Vary the number of loops and the size of loops for interest.
- Bigger loops are harder to keep circular than smaller ones.
- To keep your loops circular, be sure to continue your loop to make a full circle before going off onto a meander again.
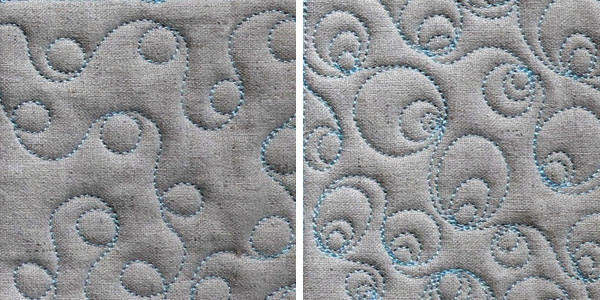
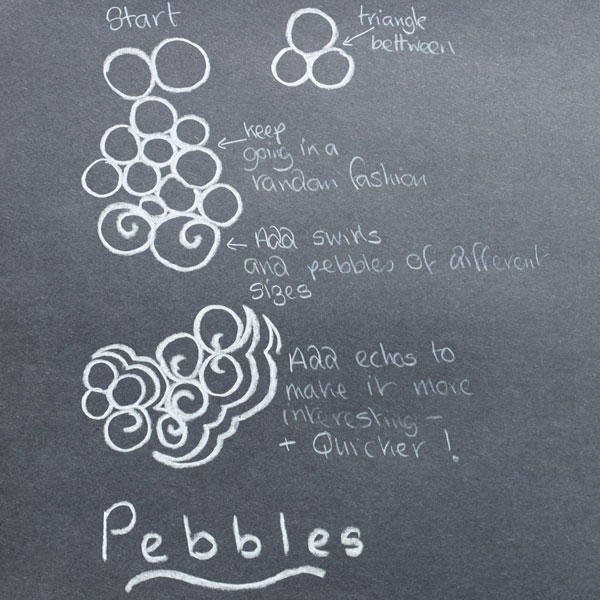
Pebbles
- Everyone loves the look of pebbles, but they require practice to make them look good.
- Pebbling is usually done at a faster machine speed to allow for flow.
- Stitch length is usually smaller for rounder shapes. A long stitch will result in hexagons!
- Pebbling is time-consuming.
- Mix up the sizes for a design that is pleasing on the eye and less tricky to execute.
- Extend the design by adding a swirl inside some of the pebbles, back-filling the space between the pebbles and adding echo lines to break up the area of pebbles.
- Make some of your pebbles appear to be behind each other for interest.
- Avoid crossing over previous pebbles by travelling back along a pebble to a point where a whole pebble can be made. Small triangles and other shapes are left between the pebbles.

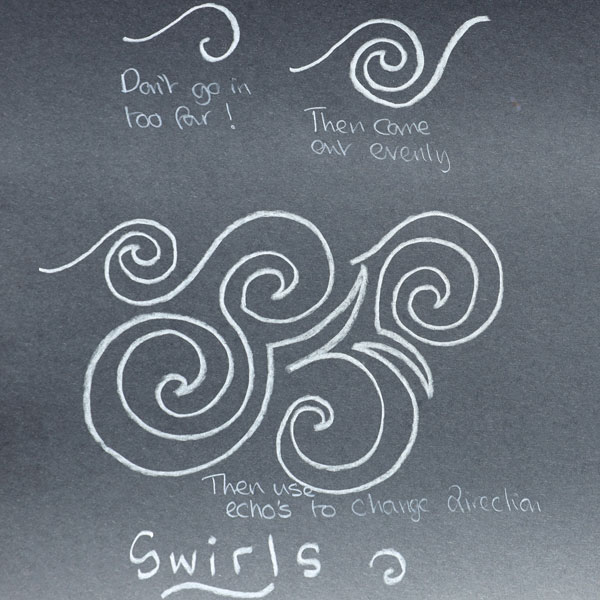
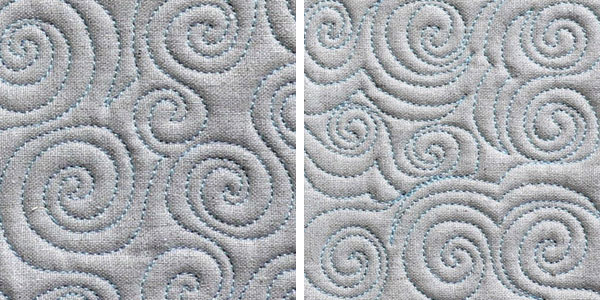
Swirls
- Swirls are very versatile designs that work well in varying sizes, from very small to large meanders.
- Complete the outside first, allow room to come out and on change of direction go inside so that the first outside swirl stays the outside swirl.
- The further in you go, the closer the spiral will be.
- When extending the swirl design, add different echo shapes that take you to different parts of the quilting area. This is also helpful for changing directions. Do this often for interest.
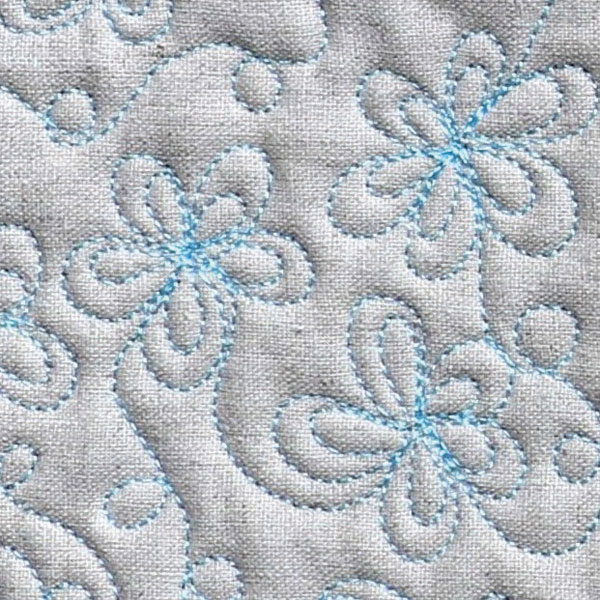
Flowers
- I have saved my favourite to last.
- When choosing a flower design, it is often best to stick to just one or two styles and to vary their size.
- Flowers usually have odd numbers of petals, but do not worry too much if some have five — some have six! Variety is the key to this style of quilting.
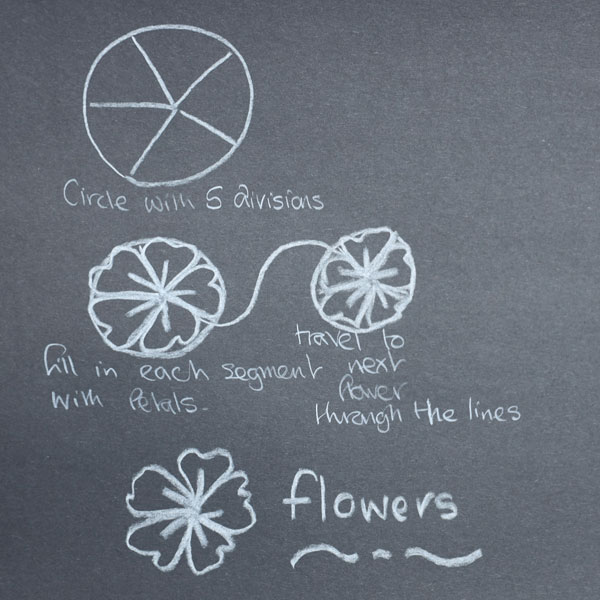
- I do my flowers by drawing random circles around the quilt in varying sizes. The size will vary depending on the scale of your project. This method works for any flower size.
- Divide each circle into five sections.
- Quilt each petal of the flower within a segment. This gives you an outside boundary for the petals and makes them uniform.
- Travel to the next flower with a meander line. When you are stitching the meander lines, be sure to travel along the edge of a petal, not through the middle.
I hope you enjoy quilting these designs. When you get good at quilting them in a small scale, try them out in larger sizes that you can use as all-over designs for your quilts. Remember, do not give yourself a hard time, it takes practice.
As my saying goes, “Do it once it’s a mistake, do it twice it’s a pattern.” Next time we will take these shapes a step further and use them and others to create background designs that are unique to you and your quilts.
Until then,
Happy quilting
Anita