Quilting Advice from Deborah Louie: Free-Motion Quilting with a Cross Hatch Stencil
Take one cross hatch stencil and a free-motion foot… We’ve looked at using a walking foot and a one-inch cross-hatch stencil to create interesting quilting designs and textures in a previous blog post. In this blog post, we look at using a free-motion foot and the same stencil to undertake free-motion quilting. By Deborah Louie
With all free-motion quilting we attach the free-motion darning foot on the machine. I like to use an open toe #24 foot on my Bernina. Then we drop or disengage the feed dogs and take the stitch length to zero. Perhaps, if you are new to free-motion quilting, practise for a while on a scrap fabric basted with batting. Slowly move the fabric with your hands slightly up and down, then left and right. With free-motion quilting you do not have to turn your quilts — just slide them under your hands, nice and easy. The speed of the needle depends on your level of expertise; if you are a new free-motion quilter, then perhaps take the speed of the needle to between slow and medium. When you are feeling more comfortable, speed up the needle. Make the machine match the speed of your hands — do not try to match the machine’s top speed with your hands. The machine is too fast. Usually slow and easy does it. Take your time and relax the shoulders, and enjoy the process.
Free-motion squares are hard to achieve and look straight if you free-form them without any marking on the fabric. When you pounce the cross-hatch on the fabric it gives a beautiful, even distance as a basis for the squares. This is great for modern quilts or large areas on a quilt that needs quilting. I have approached the cross-hatch differently with each sample here, so I hope this inspires you to give cross-hatch stencils another look.
With all samples, I have given you stitch direction diagrams to follow and try out for yourself. I always try to think about the next square before I start out. We want to work continuously, not starting and stopping our threads. Finishing next to the start of the following square really helps if you think and plan for this before you start stitching.
For all of the free-motion quilting in these samples, I have used Mettler Polysheen threads in the needle and the bobbin as they sit flat on the fabric, and have a little shine to them.
Free-Motion Quilting Techniques
Sample 1
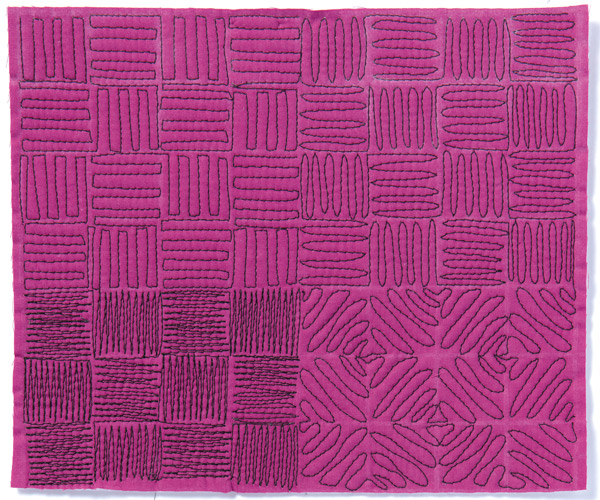
When quilting the first sample, I used the grid purely as a gauge for distance, creating one-inch squares of vertical and horizontal lines. For the first section I stitched straight lines, with straight edges at the bottom. In the second section I rounded off, or curved, the bottom of the lines. In the third section I kept the lines very close together, creating a dense flat texture. For the last section I curved these on the diagonal, giving a different look altogether. These free-motion hatching designs are fabulous on modern quilts as a background filler in large areas, and they make terrific texture when you use the same colour thread as the fabric, even as hatching on houses, roofs etc. Endless possibilities.
Check out our cute Behind the Mask Raccoon Quilt!
Sample 2
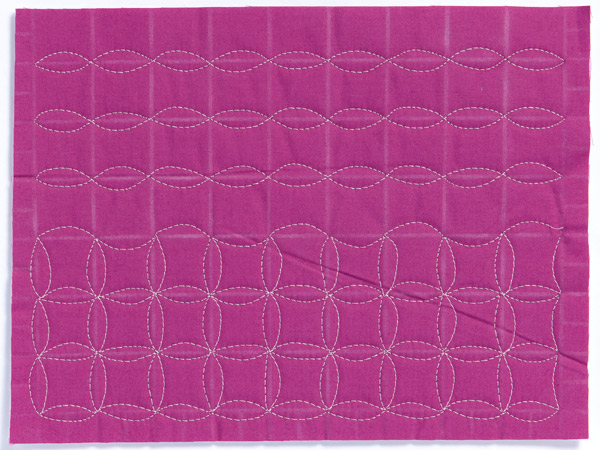
I really love continuous curves for a beautiful, soft texture. It makes a wonderful filler. At first I just stitched the ribbon effect. This is done by stitching left then right, then left then right etc … all the way down to the bottom. Stopping, cutting threads and starting at the top again, working the opposite direction. This is a perfect free-motion practice design, like a drill for quilting skills.
For the next design, which is also continuous curves, I have stitched both down and across at the same time, continuing to the bottom. I then cut off the threads and worked from the top again, moving down just like with the ribbon design. Because I used the pounced grid, the distance between the curved boxes is even. The pounced grid brushed away after quilting, never to be seen again. It does its job beautifully.
Sample 3
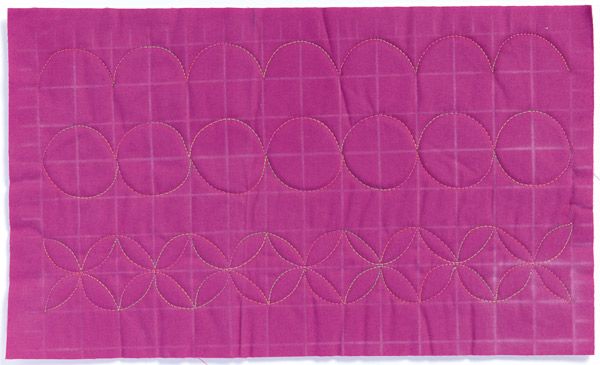
I think this sample is very interesting. For the first row on the left, I jumped a one-inch square and quilted a clamshell curve over two squares in the row, working top to bottom. You could do rows of these, starting each subsequent row one square down to create multiple clamshells. Great for borders or a soft cloud look in skies.
How about quilting big circles? These are hard to do, but not if we break them up, working top to bottom. Quilt the left clam first. The right-hand side clam joins to make circle. Easy…
Using the same clam curves technique, you can also easily create the orange peel design. Look at the diagram — first one row of clams and then another touching. Quilt half a curve first to the centre of the first clam, then a full clam all the way down. Cut the threads and repeat on the other side. Who would have thought all of that from a cross-hatch stencil!
Browse new quilting patterns here!
Sample 4
These pretty boxed fans work a treat and are easy. This design works around a central line, with the fans created flipping from one side of the central line to the other. The lines of the fans fill the square, then the quilting travels down a straight line and continues on to fill the opposite square with the fan. See diagram.

Sample 5
Same sort of principle as the boxed fans, but I have spread the flowers into two adjacent squares and worked left and right. Petals do not have to be the same size every time — let them be soft and pretty, and all a little different. I also stitched a line in the centre of each petal for some extra texture. So cute in a sashing for a little girl’s quilt.

Check out our lovely Bye Bye Baby Quilt!
Sample 6
The leaves follow the same principle as the flowers and boxed fans. I find this design a little easier and it has a lovely left/right flow to the connecting line. The curve goes left and the leaf goes left. Curve goes right and the leaf stitches right. I stitch the centre of the leaf first, backtrack or travel back up that line, then complete the outer leaf shape. The leaves are a perfect distance apart and are still relaxed and free form.

Sample 7
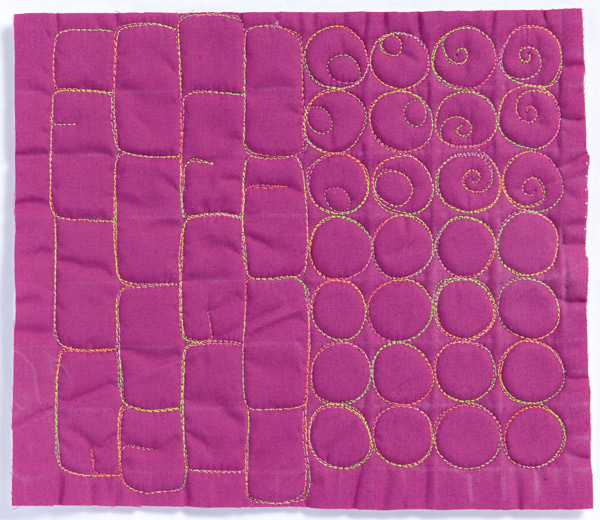
I had a bit of extra fun here stitching bubbles, lots of bubbles. With the aid of the cross-hatch the bubbles are the same size, and all in a row, which is hard to do when free-motion quilting this design. I went around each bubble two or three times to make them pop. I worked in a clockwise direction for one bubble, and alternating the direction, anti-clockwise for the next bubble. Adding a little spiral inside some of them adds a whimsical touch.
To complete the bricks sample underneath the bubbles, I stitched every second cross-hatch and added some cracks in the bricks. For the row underneath, I left one square free at the beginning to offset the quilted bricks, and start working across in the same manner. Work this design in alternating rows, starting with either a full brick or a half brick.
So all of this from a one-inch cross-hatch stencil. There are many more options, but these should get you going with some free-motion quilting fun.
Happy quilting!
Find out more about Deborah Louie and Free-Motion Quilting
Website: www.deborahlouie.com.au