Technique Tutorial: Learn About Binding
For many quilters, binding seems to be the least favourite part of making a quilt. Personally, it is one of my favourites, although I don’t get to do it as often as I would like. I always sew my binding to the quilt front by machine, and then I hand sew the folded binding to the back of the quilt. I find I just can’t get a neat result if I try to secure the folded edge by machine. Give it a go either way and see which you prefer.
While the binding is a fairly simple part of the construction of a quilt, there are a few considerations to keep in mind, including choosing the fabric, deciding if you want straight of grain or bias, and the method you use to attach the binding to the quilt. That all sounds simple, but let’s work through the steps as each has its particular focus.
Fabric choice: Do you want the binding to add a pop of colour or blend into the main quilt top fabric, a spot, stripes maybe? All these can have a real impact on the finished quilt.
Straight or bias grain: The grain line is instrumental in how the binding wears; it is also important when you have a quilt with curves. If your quilt has straight edges, then your consideration will be for strength and for effect. A bias grain will give you a more sturdy folded edge; a bias grain may be necessary to give you an angled striped effect. If you like the ease of cutting straight strips and sewing them together, then straight grain will be best cut on the crossways grain, not the lengthwise grain. Additionally, cutting binding strips across the width of the fabric is a more economical and less-challenging task. A bias grain will be necessary for all quilts with curved edges. The bias grain will allow you to ease the binding along the curves.
Cutting the binding strips: As mentioned in the last section, your option to cut straight of grain across the width of fabric is the easier and more economical. You simply need to measure the four sides of the quilt top/sandwich and add them together. Add an additional 30cm (12in) and that is the length you will need. Divide this length by the width of the fabric: let’s say the length you will need is 430cm (169in) (that includes the additional 30cm [12in]) and your fabric is 114cm (45in) (the most common width) — therefore 430cm (169in) divided by 114cm (45in) is four strips.
Note that the most common width to cut the strips is 2½in. So if you require four strips at the width of the fabric, and each strip is 2½in wide, you will require 10in of the fabric you have chosen for your binding. It is best to round that up to at least 15in to ensure you have enough. Cutting bias binding is a very different technique — and one that we will cover in a future issue.
Sewing strips together: Each strip cut across the width of the fabric needs to be sewn together to create a long binding strip. These seams are sewn on the bias to better distribute the bulk of the seam on the folded edge of the binding.
Lay two strips at a right angle to each other with the ends overlapping, right sides together. Place a pin in the strips at the outer corner as shown in Diagram 1.
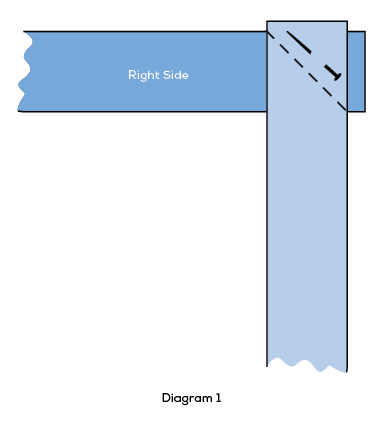
Stitch a diagonal line across where the two strips meet, either by eye, or by drawing a line on the uppermost fabric strip.
Trim the excess fabric leaving a ¼in seam as shown in Diagram 2. Flip the strips open to form a continuous straight strip, see Diagram 3.
Learn how to bind, quilt and piece on a mid-arm quilting machine with Paula Storm


Continue sewing strips together in this manner until you have reached the required length.
Iron the binding strip, then fold it in half lengthways, wrong sides together, and press the fold.
Squaring the quilted sandwich: After the quilt sandwich has been quilted, and before the binding can be sewn to the quilt, the quilt needs to be squared up — that is, each corner must be a 90-degree angle and the edges straight.
It helps if you sew a ⅛in seam around the edge of the quilt sandwich first; it helps the quilt sandwich stay flat during the binding process.
Then trim away any excess from the perimeter of the quilt to make it neat and even. Using a square ruler and straight-edge ruler, begin by checking that each corner is square. If not, carefully trim the edges along the ruler. Continue using the edge of the ruler to find and trim the true straight edge, and the corners around the quilt.
Stitch your own Petit Amour sewing accessories with Lisa Pyke’s pattern
Sewing the binding to the quilt top: Next, line up the raw edge of the folded binding strip with the raw edge of the quilt. The folded part of the binding strip should be facing towards centre of the quilt.
Begin sewing about a third of the way up one side of the quilt, leaving a 15cm (6in) tail.
The most common seam allowance to use when sewing the binding is ¼in. You can use a walking foot to sew the binding strip to the front of the quilt, but it is not necessary.
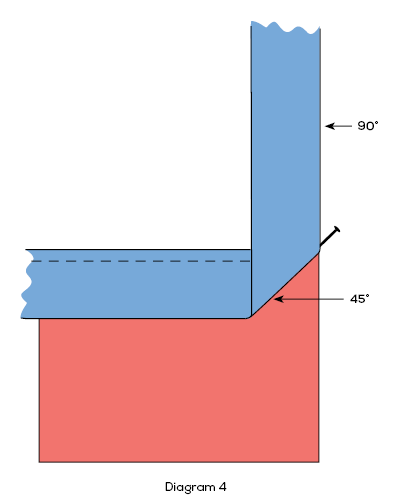
Sew along the first side of the quilt until you’ve reached ¼in before the corner, then stop sewing. Backstitch about 3mm (⅛in) and cut the threads. Then, pull the quilt out from under the foot just a little, and place a pin from the corner of the quilt top through the point where you stopped sewing the binding down. Flip the long end of the binding upwards at a 90-degree angle — the fold will sit along the line of the pin forming a 45-degree angle as shown in Diagram 4.
Keeping the folded angle in place, fold the tail down so that its raw edge is aligned with the raw edge of the next side of the quilt.
Gently place the edge back under the foot with the needle placed so it will begin stitching on the lower edge of the fold, as close as possible to where the first line of stitching finished on the other side of this fold. Do a few backstitches to hold the seam. Continue stitching down the next side and sew the corners in the same manner. See Diagram 5.

When your stitching approaches the place where you began, stop stitching about 20cm (4in) away from the starting point. Trim the tails, leaving just enough fabric to overlap the starting place by about 4cm (1½in). Fold the trimmed edge of the binding under by ¼in and tuck the beginning tail fabric underneath. Continue stitching along the edge of the quilt and sew over the original seam by 2cm (¾in) and backstitch and trim the threads.
Get the Gentle Pursuits Pincushion pattern
Stitch in place at the back: Fold the binding strip to the back of the quilt to create the same measurement as the seam allowance you used on the front, taking it just 3mm (⅛in) over the original sewn seam line. Secure in place firmly with pins.
Working from the front, carefully guide the quilt under the sewing foot, stitching slowly along the previous seam line. When you reach the corner, folding the binding to the back creates the mitre.
Pin in place and carefully stitch around the corner.
Alternatively, the folded binding can be hand-stitched in place, just catching the edge of the binding and securing it to the backing.
There are a few binding methods that can be used for different finishes — we will look at those in a future issue.