Creative Inspiration with Paula Storm: Perfect Points
At a recent quilt show I had a chat with a friend, Maria. She is an incredible seamstress; the dresses and heirloom stitching she can do just blows my mind. However, Maria avoids quilting. The reason, she says, is because although she carefully cuts out her pieces, carefully sews together her fabric, and carefully presses her finished block, somehow it just never measures up to what the pattern says it should. She says her block is almost always too small and it is really tricky to get the points to line up.
I know we have all been in the same situation so I thought this month I would give you my best tips to fix this problem.
First up, throw away your ¼in foot! I’m sure this is probably quite a controversial statement but I have a reason for saying it, I promise.
Have you ever noticed how, when you’re stitching, sometimes your fabric gets pulled to the right? When a sewing machine is built, it is made to have two feed dogs underneath your foot. This is because you need them to be centred under your fabric in order for the fabric to be pulled evenly under the foot. So when you use a ¼in foot, it can sometimes eliminate half or even all of one of the feed dogs.
Make the Patches and Triangles Quilt!
Think about a bicycle verses a car. When driving your car you no longer need to worry about balance because the four wheels do the balancing for you. With a two-wheel bike, however, you have to concentrate harder to make sure you don’t topple over.
It can be fun to do an experiment with your machine. Pop on your regular foot and place a piece of fabric under the needle. Start stitching (don’t go too fast) and let go of the fabric. Let the machine pull the fabric through your machine to the end of the piece. Switch to a ¼in foot and do the same thing again and see how straight the second line is. On most machines (even very expensive ones), in most cases the first line will be quite straight while the second line will veer off to one side. If this is happening with your machine you are basically fighting your machine every stitch of every seam to get it straight.

That is why my preferred method is to leave my regular foot on my machine and move my needle over. So instead of being centred to the foot, the needle is a scant quarter inch away from the right side of the foot. You’re still lining up the fabric to the edge of your foot but you’re getting a much straighter seam.
The next thing to check is that you cut and measure with just one ruler (if you can) to complete your entire quilt. Here’s another fun experiment: take all your patchwork rulers, tape measures and cutting mats. Line them up on your cutting mat or against each other. Every brand is obviously made by different companies and not all rulers are the same. The measurements might be pretty close over about 2-5in but when you get to the end of a 24in ruler, there can be quite a huge variation. This can really throw you out, especially with big blocks.
Next up is the actual cutting. I really dislike cheap cutting mats; they are usually really hard and are never going to give you a nice clean cut, and will actually blunt your blade a lot quicker. I prefer to spend a bit extra on a nice soft self-healing mat and follow the manufacturer’s care instructions. I currently have a grey Fiskars cutting mat and I love it! This matt will last me years and years so the investment was totally worth it for me.
You know that feeling when you finally decide to put a new blade in your rotary cutter and you say to yourself, “Why didn’t I change it sooner!” So I made the decision to use a new rotary cutter blade for every new large project I make. It’s probably more often than is truly necessary, but I believe a sharp blade gives better cuts, so a new blade is better than wasting fabric with bad cuts.
Create Natalie Bird’s Watering Can Quilt
The last thing to keep in mind when getting ready to stitch is threads. Are you one of those quilters who uses Nanna’s hand-me-down threads to make your quilts? While some threads can stand the test of time, have a think about how much money you spend on your fabric. You spent money on your tools and you spent money on a pattern, but when it comes to a $2-$6 thread why don’t you want to spend the money? Your thread is going to hold every part of your project together, so why use thread that has been around for 50 years? There is some really amazing quality thread out there and it’s not expensive, so I recommend using a good-quality 50-weight thread for all your piecing.
With all that prep work taken care of, the final thing to focus on is a perfect scant ¼in seam. So what is the difference between a full ¼in and a scant ¼in? Not much, to be honest; it’s really just a few threads but I promise it will make a world of difference! In this example, the black thread is a full ¼ini and the white thread is a scant ¼in.
See the difference when you press this open? That small amount really does build up over a whole quilt.
I have heard so many ladies say over the years that a ¼in seam is fine as long as all your seams are the same, and if you’re making a quilt full of four or nine patches then this is quite true. However, as soon as you throw in even one single diagonal seam (like a half-square triangle) you must make the adjustment to a scant seam or your points will never line up, regardless of how good a quilter you are.

Learn precise machine appliqué and foundation piecing

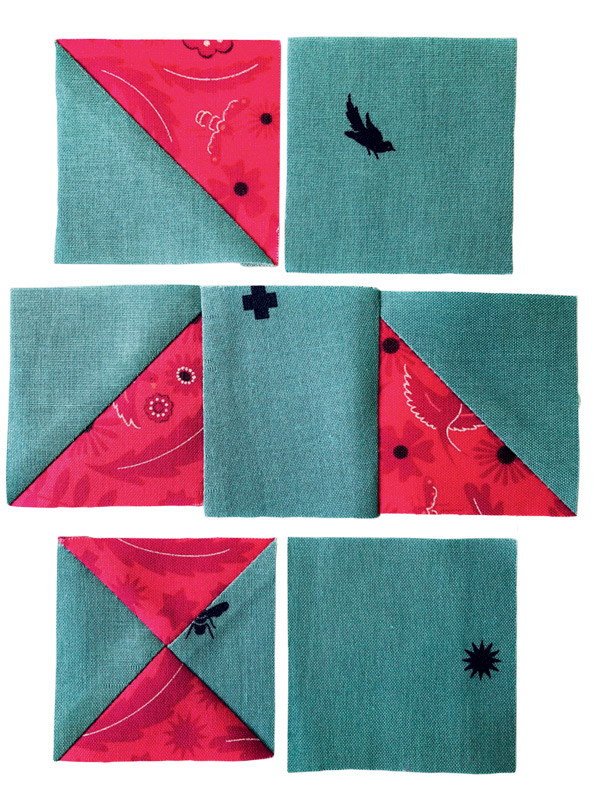
Have a look at this example. This green fabric is exactly 21/2in square. I made the half-square triangle with a full 1/4in seam and it is slightly off. When I join them together can you see how I have some extra fabric at the bottom of the plain fabric square.
Now admittedly this is not too bad and I could probably fudge this to make a decent block, but let’s see what happens when I throw in another diagonal seam.
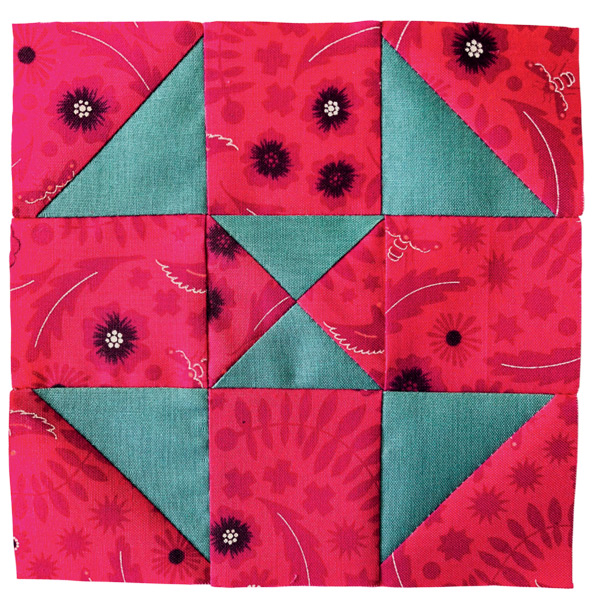
This quarter-square triangle really exaggerates the problem and I know that I could never make these blocks fit together.
Have a good look at the finished green block. No matter how hard I tried, I just couldn’t get all of the points lined up; even if I stretched it and fudged it I would be left with less that an 1/8in seam on the back. This finished piece would just not stand the test of time.