Road Test: Pick & Mix Template
Have I ever mentioned that I love my job? I adore taking a new product and trying it out. I have been doing this for a while now, and have often found it was the simplest-looking items that impressed the most. I love to piece and a multi-function tool is great value. Claire Turpin has designed a new concept, one cutting template and a Pick & Mix set of patterns to co-ordinate. The possibilities are endless.
Claire has designed the Quilt Block Template for the Pick & Mix Quilts range for multiple-size pieced units. The template is 6 1/2in long on the base, just over 3in on the right end and just shy of 5in on the opposite end, giving a slanted top, cutting edge. Basic cutting and piecing instructions come with the template. Ten different-sized pieced units can be made from the template from just two strip sizes — 4 1/2in or 6 1/2in. Eleven of the 12 pieced units are rectangles; only one is a square when pieced.
The technique for cutting with the template is to cut specific-sized rectangles from the strips. The size of the rectangle is equivalent to two of the angled shapes in the patterns. As it is an angled edge you can make left- and right-angled cuts, depending on whether you use the template right side or wrong side up. So from a 4 1/2in strip you can use 3in, 4in, 5in, 6in or 7in lengths. Or from a 6 1/2in strip you can use 4in, 5in, 6in, 7in or 8in lengths.
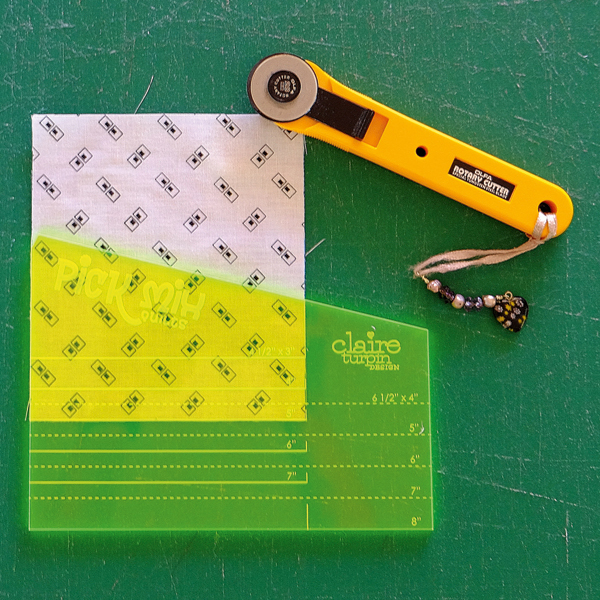
Once the strips are cut down to the right lengths, the Pick & Mix Quilt Block Template is used to cut the shapes. Marked two thirds of the way across the ruler is a series of marks that you use to line up and cut the 4 1/2in rectangles. The 4 1/2in width of the strip fits into the markings and you line up the base with the length of the cut: 5in in the photo. A cut is then made along the angled edge. This results in two equal shapes, from which it is critical that you take off the point with the template. It helps to line up the pieces when you come to sew. When cutting the 6 1/2in strips, the full width of the template is used and the dotted lines run along the base of the size that corresponds to the cut length. Again the corner needs to be taken off.
When you are cutting, you need to cut the background and the coloured fabric in the same direction. The two angled cuts then come together to make the blocks. Some patterns feature blocks made in only one direction. Others require the mirror image cuts. Claire writes specific instructions for the type of cut required for each of the projects. Placing fabrics right sides together when cutting with the template is one of the easiest ways to create the mirror image cuts.
When you piece the two portions of the blocks, the cut-off corner is a guide for where to place the oddly angled cut edges to end up with straight edges once stitched and pressed. Not matter what size, all units are pieced in the same manner. Pressing changes with the projects.
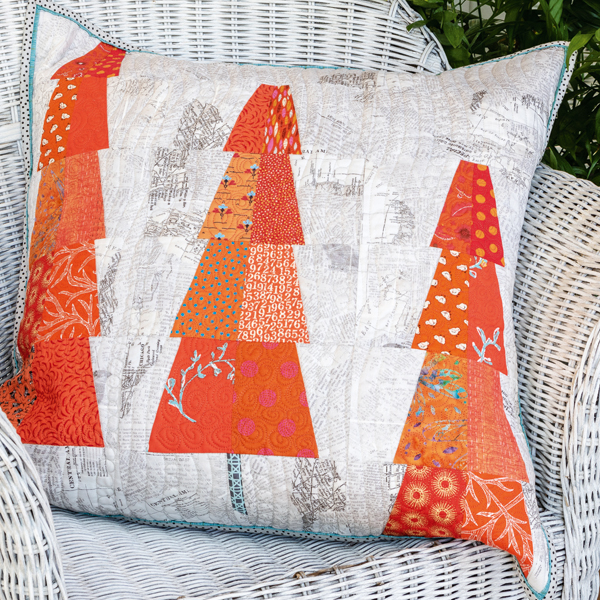
The design concept that Claire has developed is that you choose a Pick & Mix pieced quilt pattern using the template, then you add one of Claire’s quirky appliqué patterns to the piecing to customise the design and make it your own unique design. My sample cushion used a portion of the Pick & Mix Trees quilt pattern. I did not add any appliqué at this time. However, Claire added one of the two stylised fox designs from her Foxies cushion pattern to the base of the pieced trees full quilt project. You could make the design for Christmas and add Santa and his reindeer, or maybe a unicorn is more your granddaughter’s style, or camping vans would suit the grey nomads as a gift for their caravan! Claire has opened up a world of possibilities for you.
All the resulting pieced units made from the Pick & Mix Template are reasonably large, so the projects progress at a quick rate. There are not too many opposing seams to worry about in the piecing of the units, only when the blocks are put together in the cushion or quilt. My finished sample cushion is 24in square, so you could squeeze a European cushion insert into this project.
I did start the other cushion in the blues for the article. I will finish it, but learnt that I prefer to have a busier background and scrappier contrast fabrics rather than a select few fabrics. This is a personal choice, however, and regardless of what you decide to make, I am sure you will have fun with this ruler. It is available at your local patchwork shop, or for wholesale enquiries contact www.creativeabundance.com.au.